Booting Virtual Machines Using iSCSI: Part 1
Preparing the Hypervisor and iSCSI Target
In the past year I’ve discovered a need to be able to easily test iSCSI boot configurations, preferably without special hardware or dedicated storage arrays. I’ve come up with this solution for working with virtual machines to test OS installation and boot with iSCSI storage. Obviously this doesn’t replace the need to validate real iSCSI deployment scenarios – but it works for me to easily check installers, kernel iBFT support, initramfs implementations, and system init configuration for iSCSI root.
I’m currently using Fedora 19 as both my virtualization host and iSCSI target, with a variety of Linux distributions running in VMs (primarily multiple versions of Fedora and RHEL).
The Pieces
- Hypervisor: KVM managed through libvirt / virt-manager
- Boot firmware: iPXE provides our pre-OS iSCSI stack
- iSCSI Initiator: Open-iSCSI, kernel modules + iscsid, iscsiadm tools
- iSCSI Target: LIO/TCM kernel target stack, managed via targetcli
- Volume Management: LVM2
- DHCP Server: ISC DHCP
Host Configuration Steps:
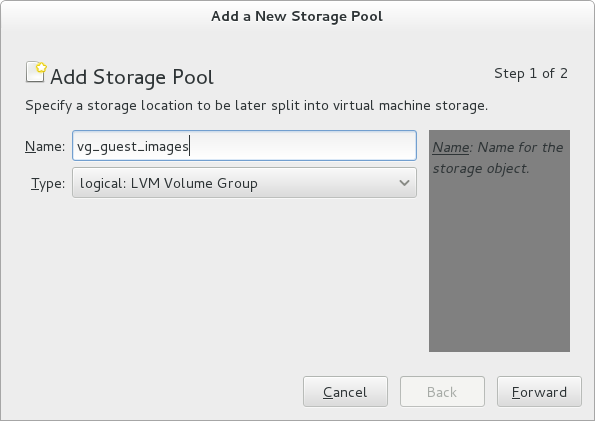
LVM Storage Pool
We could work with disk images files, but because we want to access the storage directly using iSCSI they would have to be raw images and not qcow2 or any other specialized disk image format. An LVM volume group seems like a better choice. I like to make libvirt aware of my storage, so I can put all my VM volumes in one place and have the choice to either assign them through virtio channels or through iSCSI.
Data Destroying Operations
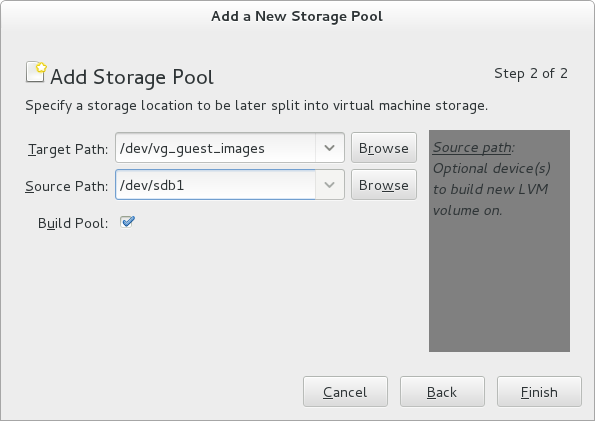
The following commands to set up a storage pool all require an unused physical disk partition, which will be formatted and any existing data will be erased. The given commands match my configuration (creating an LVM physical volume on the first partition of a secondary disk: /dev/sdb1), any may be different from yours. Be sure you know what you’re doing.
You can set this up using the virt-manager GUI: Edit > Connection Details > Storage >
libvirt iSCSI pools
The iSCSI support in libvirt manages the initiator side of the connection on the VM host, allowing volumes to then be assigned to the VM over virtio. This works fine for many setups, but the point here is to run the full iSCSI initiator stack in the VM.
You can also set this up using virsh:
$ virsh pool-create-as vg_guest_images logical - - /dev/sdb1 vg_guest_images /dev/vg_guest_images
Or, directly using lvm2 if you don’t care about sharing the volume group with libvirt:
$ pvcreate /dev/sdb1
$ vgcreate vg_guest_images /dev/sdb1
iSCSI Target Configuration
We’ll setup the basic iSCSI target configuration now, using targetcli. For all of the target and initiator setups I’ll be using iSCSI Qualified Names of the form iqn.1992-01.com.example:*
First, start targetcli and create a new iSCSI target and target portal group.
$ targetcli
targetcli shell version 2.1.fb30
Copyright 2011-2013 by Datera, Inc and others.
For help on commands, type 'help'.

/> cd iscsi
/iscsi> create iqn.1992-01.com.example:target.0
Created target iqn.1992-01.com.example:target.0.
Created TPG 1.
Now I disable CHAP authentication for the target portal group, as I don’t want to manage CHAP secrets for my test-bench setup. I believe it can be made to work, but there’s no way to save settings for iPXE short of creating custom boot ROM images for every VM, so the CHAP secrets would need to be passed in somehow (we’ll see how to use DHCP for passing in settings to iPXE in a bit).
/iscsi> cd iqn.1992-01.com.example:target.0/tpg1
/iscsi/iqn.19...target.0/tpg1> set attribute authentication=0
Parameter authentication is now '0'.
And create a network portal on our virtual network interface.
/iscsi/iqn.19...target.0/tpg1> cd portals
/iscsi/iqn.19.../tpg1/portals> create 192.168.122.1
Using default IP port 3260
Created network portal 192.168.122.1:3260.
Make sure the configuration is saved, and exit.
/iscsi/iqn.19.../tpg1/portals> cd /
/> ls
o- / ..................................................................... [...]
  o- backstores .......................................................... [...]
  | o- block .............................................. [Storage Objects: 0]
  | o- fileio ............................................. [Storage Objects: 0]
  | o- pscsi .............................................. [Storage Objects: 0]
  | o- ramdisk ............................................ [Storage Objects: 0]
  o- iscsi ........................................................ [Targets: 1]
  | o- iqn.1992-01.com.example:target.0 .............................. [TPGs: 1]
  |   o- tpg1 ........................................... [no-gen-acls, no-auth]
  |     o- acls ...................................................... [ACLs: 0]
  |     o- luns ...................................................... [LUNs: 0]
  |     o- portals ................................................ [Portals: 1]
  |       o- 192.168.122.1:3260 ........................................... [OK]
  o- loopback ..................................................... [Targets: 0]
/> saveconfig
Last 10 configs saved in /etc/target/backup.
Configuration saved to /etc/target/saveconfig.json
/> exit
Global pref auto_save_on_exit=true
Last 10 configs saved in /etc/target/backup.
Configuration saved to /etc/target/saveconfig.json
libvirt Network Configuration
The default libvirt network configuration is going to need some changes. In order to make use of the iPXE boot ROM iSCSI support, we’ll be disabling the DHCP server provided by the libvirt managed dnsmasq and running a dedicated DHCP server with a custom configuration.
$ virsh net-edit default
You should see the default network configuration that looks something like this:
network-default.xml
1 2 3 4 5 6 7 8 9 10 | |
delete the dhcp configuration, leaving something like this:
network-default.xml
1 2 3 4 5 6 7 | |
DHCP Server Configuration
Edit /etc/dhcp/dhcpd.conf and add the following content:
/etc/dhcp/dhcpd.conf
1 2 3 4 5 6 7 8 9 10 11 12 13 14 15 16 17 18 19 20 21 22 23 | |
The first block of option commands prepares dhcpd to serve up some options that it doesn’t know about by default. Option 203 is used to inform a DHCP client of it’s iSCSI Qualified Name, while the other commands allow us to use the iPXE specific keep-san directive.
The subnet configuration block is our replacement for what was removed from the libvirt network configuration, optionally with an added domain name setting.
The group is where we are going to add host setting for out iSCSI booting VMs. For now it sets the root-path option with the IP address and IQN of our iSCSI target, and enabled the iPXE keep-san option. Those options will be shared by all iSCSI boot enabled VMs.
keep-san
The keep-san option is required during install, when we want iPXE to attach to the iSCSI target and then continue on to booting from an installer image. I’ve found that without it, the iPXE code will leave the iBFT table in RAM, but not reserve the region leaving it marked as usable. At some point during install, that memory can be reused and the iBFT contents become corrupt. For me that would happen during filesystem creation, just before package installation, and when anaconda would attempt to verify the network settings it would result in the network interface going offline at a critical moment.
In the next post I’ll walk through using this setup, creating a storage volume in our iSCSI target and installing an OS to in from within a VM.
Additional References:
- LVM2 and libvirt Storage Pools
- http://docs.fedoraproject.org/en-US/Fedora/14/html/Storage_Administration_Guide/ch-lvm.html
- http://docs.fedoraproject.org/en-US/Fedora/18/html/Virtualization_Administration_Guide/chap-Virtualization_Administration_Guide-Storage_Pools-Storage_Pools.html#sect-Virtualization-Storage_Pools-Creating-LVM
- http://libvirt.org/formatstorage.html
- iPXE Options via DHCP
- iSCSI Target Core and targetcli